Featured 1

Curabitur et lectus vitae purus tincidunt laoreet sit amet ac ipsum. Proin tincidunt mattis nisi a scelerisque. Aliquam placerat dapibus eros non ullamcorper. Integer interdum ullamcorper venenatis. Pellentesque habitant morbi tristique senectus et netus et malesuada fames ac turpis egestas.

Featured 2

Curabitur et lectus vitae purus tincidunt laoreet sit amet ac ipsum. Proin tincidunt mattis nisi a scelerisque. Aliquam placerat dapibus eros non ullamcorper. Integer interdum ullamcorper venenatis. Pellentesque habitant morbi tristique senectus et netus et malesuada fames ac turpis egestas.

Featured 3

Curabitur et lectus vitae purus tincidunt laoreet sit amet ac ipsum. Proin tincidunt mattis nisi a scelerisque. Aliquam placerat dapibus eros non ullamcorper. Integer interdum ullamcorper venenatis. Pellentesque habitant morbi tristique senectus et netus et malesuada fames ac turpis egestas.

Featured 4

Curabitur et lectus vitae purus tincidunt laoreet sit amet ac ipsum. Proin tincidunt mattis nisi a scelerisque. Aliquam placerat dapibus eros non ullamcorper. Integer interdum ullamcorper venenatis. Pellentesque habitant morbi tristique senectus et netus et malesuada fames ac turpis egestas.

Featured 5

Curabitur et lectus vitae purus tincidunt laoreet sit amet ac ipsum. Proin tincidunt mattis nisi a scelerisque. Aliquam placerat dapibus eros non ullamcorper. Integer interdum ullamcorper venenatis. Pellentesque habitant morbi tristique senectus et netus et malesuada fames ac turpis egestas.

down

Showing posts with label Tutorial video. Show all posts

11.08.2011

Macrame dragonfly tutorial

http://th05.deviantart.net/fs11/PRE/i/2006/207/8/9/Dragonfly_knot_by_MrJin.jpg

Tutorial: Chinese Knot Dragonflies


macrame dragonfly tutorial
1. Double the cord to make two equal lengths
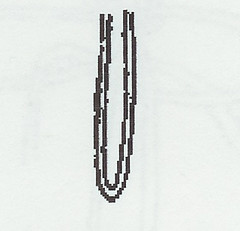

2. Let the ends fall as shown leaving the center loop be the length of the dragon fly that you are making. This is the length of the body. Here is where you can add beads for eyes. They go on at the top of the “M”
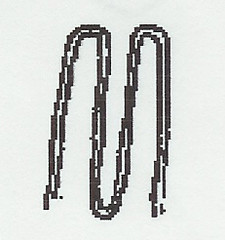

3. Bring the right leg over and under as shown.
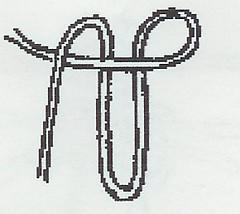

4. Bring the left leg behind the body and through the loop as shown.
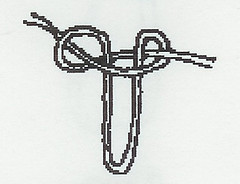

5. This repeats step 3 in the reverse direction
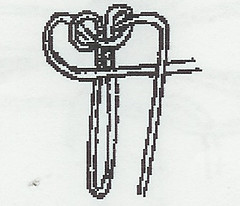

6. This repeats step 4 in the reverse direction. A complete square knot is formed. You may choose to do one or two complete square knots to form the head of the dragonfly.
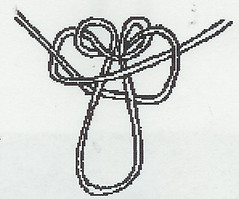

7. The first wing pair is formed as in step three. Allow enough length to produce proper wing to body proportion.
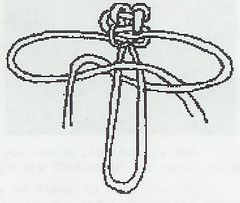

8. Complete the square knot as in step 4. Take care in tightening the knot to allow the wing lengths to stay equal. Tighten carefully and slide the knot up the body loop to the desired position.
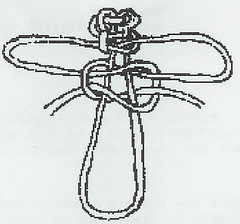

9. Add a second wing set as in step 7 and step 8. Tighten the second wing set and move to position. The body is then completed by square knotting as in steps 3 through 6 above, down the length of the body loop.
10. Tighten carefully as you go. Ending can be completed by trimming loose ends and applying a dot of glue to secure.
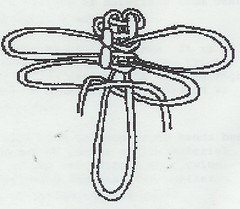

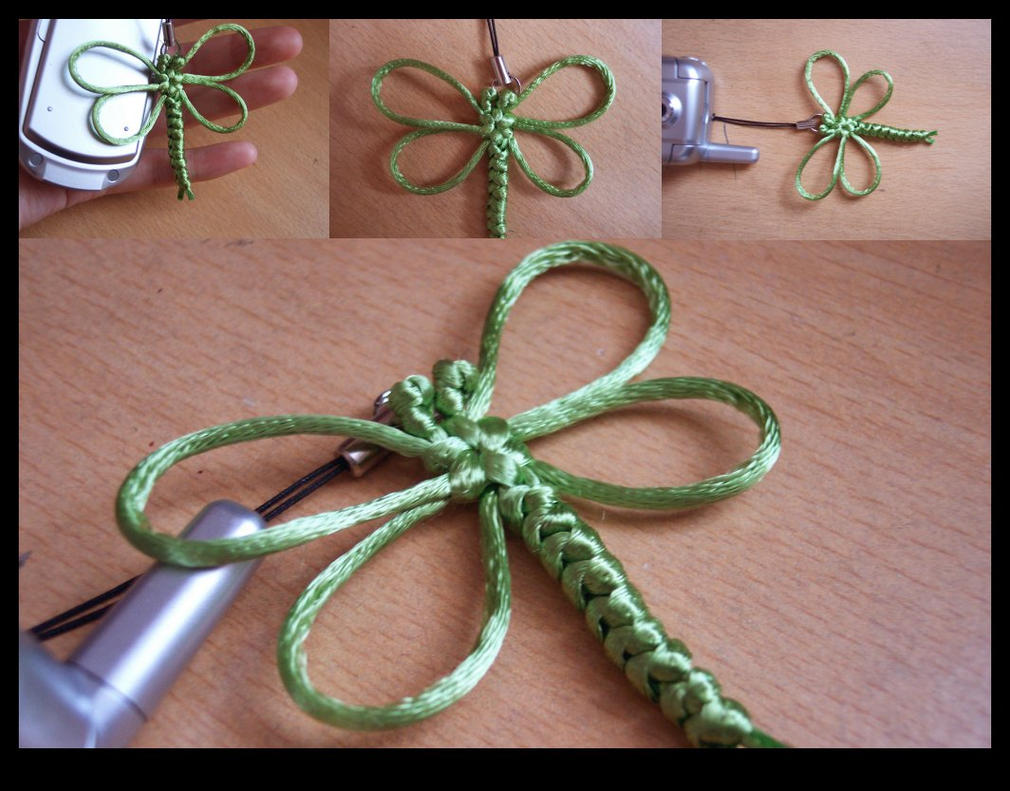
and the finished dragonfly:
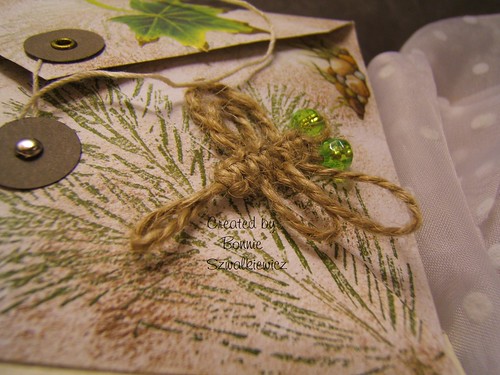
2009-01-14 010

 Read more: http://craftiblog.wordpress.com/2006/04/22/macrame-dragonfly-1/

10.02.2011

Paper crafts for kids: Origami Spring Bunny, video tutorial

https://blogger.googleusercontent.com/img/b/R29vZ2xl/AVvXsEhEQ3ljwtuFJmcXzGZA_tRCmaPSmgqMqpuJkXwyRmo28n79kHzdj64eNuqDJmSNuJhBN9s3776lu84p5KPb_IziWHUwlzPe8W9-3_4NGE37q6V8RuSmNtOPZL61hZdFTNxjtMrodelZ7tVl/s200/origami+bunny3.jpg
 Paper crafts  for kids: Origami Spring Bunny, video tutorial
I found the awesomest tutorial for inflatable Origami Bunnies on You tube. I went a little bonkers and made a whole herd of bunnies living in their cozy little warren. Wanna see??
And, this wouldn't be a craft blog if I didn't include something involving sheet music. So, here you have it, a sheet music bunny:

How about some Bunnies with Whiskers?? I couldn't decide which I liked better. To make the whiskers I just used 3 pieces of hemp rope, hot glue them to the face, and a little pink felt triangle hot glued on top:
How To Make an Origami Inflatable Bunny

How To Make an Origami Inflatable Bunny on Howcast

If you are interested in making your own check out this video!!


How To Make an Origami Inflatable Bunny on Howcast

10.01.2011

Craft present for kids: Crochet Baby Cap Two Pom Poms - video tutorial


Craft present for kids: Crochet Baby Cap Two Pom Poms - Option A


If you are a beginner, you can find a playlist for the basic crochet stitches by clicking on this link. Beginner Crochet Stitches 

Note: If you made this cap with the pom poms, it does have small yarn tails that may come out of the yarn pom-poms. Please keep this in mind around small babies and children.
Written by Teresa Richardson

Skill Level - Beginner/Intermediate
Abbreviations
DC - Double Crochet
HDC - Half Double Crochet
CH - Chain
SL ST - Slip Stitch

FPDC - Front Post Double Crochet
BPDC - Back Post Double Crochet


DefinitionsFront Post Double Crochet - Put your hook to the right of the stitch, around the post and up the opposite side.  
Complete the double crochet.
Left Hand Front Post Double Crochet - Put your hook to the left of the stitch, around the post and up the opposite side. Complete the double crochet.

Back Post Double Crochet
 - Put your hook to the backside right of the stitch, around the front, to the left. Wrap the yarn over, pull it through, complete the stitch.

Left Hand Back Post Double Crochet - Put your hook to the backside left of the stitch, around the front, to the right. Wrap the yarn over, pull it through, complete the stitch. 

Continual Round -
 Put your hook through the top of the first stitch and work the single crochet or stitch that you are working.  This technique is worked instead of joining, to eliminate the seam that will show up when you join rounds.


Yarn Marker -  Marker for the first stitch of each round. I use scrap pieces of yarn to mark the first stitch.  
Work a loose chain of 42. Make sure the chain is not twisted. Join with the beginning chain.


Round 1: Work a chain 1, this will not count as a stitch.  In the same chain, work one double crochet. Work one DC in each chain around for a total of 42 double crochet. Join with the beginning stitch.


Round 2-3: 
Work a chain 1, this will not count as a stitch.  We will be working a series of post stitches. *Work a front post double crochet. (see definitions above for details on how to work the FPDC) Work a back post double crochet for each of the next two stitches. (see definitions above for details on how to work the BPDC, continue around from * for a total of 42 stitches. Join with the beginning stitch. Cut the yarn and change color.

Round 4-11: Attach the new color of yarn to the top of any stitch. Work a chain one, single crochet in the same stitch.  Work 1 SC in each stitch around for a total of 42. Work the continual round.  You may want to use a yarn marker to mark what would be the first stitch in each round.  Upon completion, cut a long length of tail. This will be used to sew the top of the cap shut. 


Thread your tapestry needle and turn the cap inside out. You will skip 6-7 stitches on each side, sewing the top, center shut. Knot and secure the strand when you get to the to the other side.  Hide the tail between the stitches. Flip the cap right side out.

Cap Corners: Attach the yarn to any stitch in the corner of the stitches that were left un-worked.  Work three rounds of single crochet. This is to make the corner stand up a little higher than the rest of the cap.  Both sides will be done the same way. Slip stitch to finish off, cut off some extra yarn.  Weave the tail through the last round, pull the top shut. 

Attaching Pom-Pom: You will run your needle through the center of the pom-pom 5-10 times making sure it is secure. When you go back through, make sure it is slightly over from where you came up so you don't pull your yarn through.  When it is secure, make a knot underneath the ball. Hide the tail between the stitches.


Flower gifts: Edible Centerpiece, The Veggie Bouquet tutorial

edible vegetable bouquet
Most of you have probably seen an edible bouquet before – usually of the fruit or cookie variety – but this particular design is definitely a stand-out!
The edible veggie bouquet pictured above is from Marley Majcher‘s 40th Birthday Party (more details coming soon) and serves as great inspiration for a super-stylish take on this idea… from the choice and arrangement of the veggies to the chic display in a simple glass cylinder vase filled with black lentils.
This would be an impressive addition to the appetizer buffet for everything from parties & showers to Mother’s Day brunch! Here’s another design that features skewered veggies spraying from a melon “basket” garnished with thyme:
edible vegetable bouquet
I’m also loving the idea of doing “mini versions” of edible bouquets for guests in lieu of individual salads – and serving them in small terracotta pots with a side of veggie dip. I’m definitely going to play around with that idea soon… =)
And below is a video I found with some DIY info on creating edible bouquets… You do have to sit through a 30-second ad to get to the video, but once you get to it, there’s some good DIY info in there about 2 types of edible bouquets: one fruit version and one veggie version featuring clever “roses” make from asparagus and radishes.


How to Make Edible Bouquets

Flower gifts: Edible Centerpiece, The Veggie Bouquet tutorial

Hair style for women: Sock Bun Tutorial

http://farm6.static.flickr.com/5128/5242812098_1bece3e16e.jpg
Hair style for women: Sock Bun Tutorial


Sock Bun video Tutorial

9.29.2011

Craft lessons: Waldorf Finger Knitted Flowers, video tutorial

Fingerknitted Flowers

One thing I would love to have in my house is live plants or better yet, fresh flowers, but with two kitties it's just not an option. So, I had to improvise...

A bouquet of cat and kid friendly, all natural, homemade flowers. I found a video tutorial
They were quick and easy to make - I simply fingerknitted the flowers and sewed them onto the branches from our wool tree.


Craft lessons: Waldorf Finger Knitted Flowers, video tutorial

9.27.2011

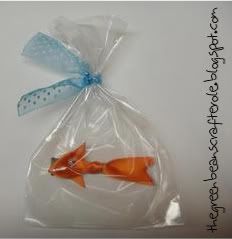
Unique gifts: Gold fish for gifts

well...you asked for a how to vid on the fishy barrettes...and i had to do what the people wanted!...lol...now keep in mind...this is my first vid...so bear with me!..and you can only watch it if you promise not to make fun of me!...i realize i have alot to learn on the movie making business...but i think from what a managed to actually get on camera...you'll be able to make one of these!...lol...enoy!...

Photobucket
Unique gifts: Gold fish for gifts

FISHY BARRETTE video tutorial